An eCommerce website is one of the smartest investments that your brand will ever make. According to data shared by Shopify, it is anticipated that the global eCommerce industry will reach almost $5 trillion by 2021. This works out to an increase of nearly 400% in just seven years.
People can only buy from a brand if they know about the brand and its products or services. So, if more people find out about your brand, your chances of bolstering your sales increase. Businesses that sell their products only by means of a brick-and-mortar store do not reach as many people as they could have reached if they had a website too.
You might be wondering if that increased exposure is worth the cost? It is. An eCommerce website costs less money than running a brick-and-mortar store. With a physical location, you have a long list of expenses that include rent, utilities, furniture, insurance and cleaning. Though, with an eCommerce store, your startup costs involve fewer things.
Not only will it not cost you a fortune, but it is also quite quick to create an eCommerce website. To help you, we’ve created this 9-point checklist.
Your 9-point Checklist for Creating an eCommerce Website:
9 Steps to Creating your eCommerce Website
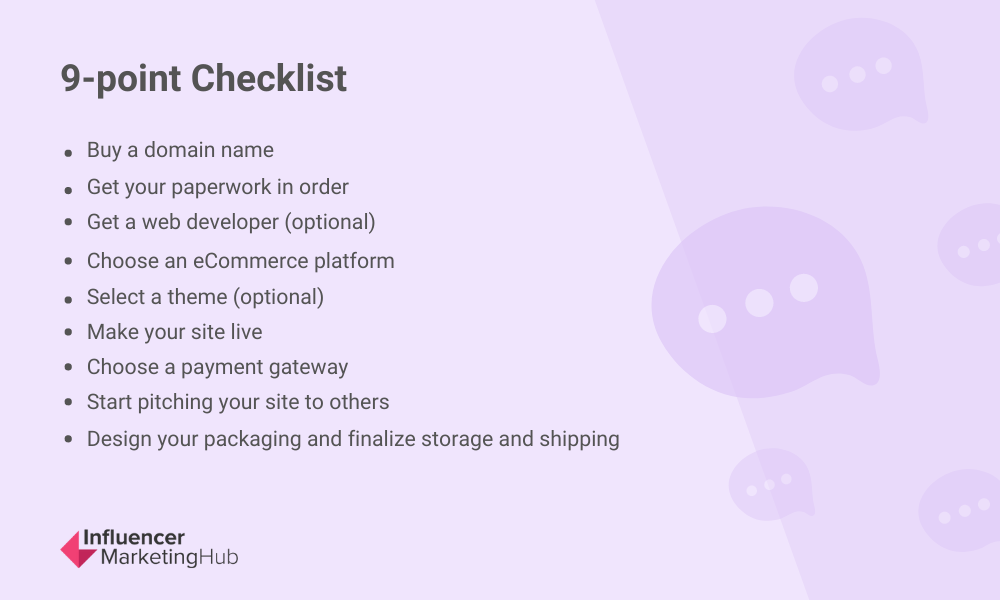
1. Buy a domain name
If you do not have a domain name yet, this is where you will start. It is good practice to make the domain name and business name the same if you can.
There is nothing much to this step: decide on a domain name for your brand, check if the domain name is still available and, if it is, purchase it. Luckily, there are several providers that can help you to secure a domain name like HostGator and GoDaddy.
While this step might sound straightforward, bear in mind that your domain name will stick with you. So, choosing your business name should be done with great care (and some objective feedback from your friends and family).
2. Get your paperwork in order
Now that you have a domain name, you can register the name of your business if you have not done it yet. To help you with this step, it is advisable to reach out to a local attorney who will be able to walk you through the legal side of starting an eCommerce business. Even if it is not really necessary, it can prevent future issues and possibly even save you future expenses. For example, depending on your location, you might have to apply for a vendor’s license or a seller’s permit. Different countries have different taxation and regulations. So, it is really best to work with a legal professional who has knowledge about eCommerce in your location.
3. Get a web developer (optional)
While you might have designed a website or blog before, building an eCommerce site is slightly different. You will need to set it up so that you can sell your products which will require more work. So, if you do not feel comfortable with designing your own eCommerce site, start your search for a developer early. Be sure to screen the candidates that you have shortlisted and ask to see the eCommerce sites that your shortlisted candidates have created for other clients. Sadly, people neglect this step too many times and, as a result, they make the process unnecessarily difficult and long.
That being said, thanks to the improvements in technology, it is now quick and easy to create completely functional (and gorgeous) eCommerce sites with the help of an eCommerce platform (see the next step). So, while you had to pay a developer in the past to design a customized website for you, this is no longer really the case.
4. Choose an eCommerce platform
Source: Koshiro K/Shutterstock.com
There are numerous eCommerce platforms available that you can use to create a beautiful and functional eCommerce site. In fact, some eCommerce platforms will help you with registering your domain and finding a hosting partner too.
In short, an eCommerce platform is a type of software solution that lets you accept online sales. The majority of these platforms help you to create a shopping website from scratch, while others (like WooCommerce) works like an add-on to an existing website builder such as WordPress.
It is best to select one of the most popular platforms like Wix, BigCommerce, Shopify or WooCommerce as they can end up being the most cost-effective. The majority of web developers have experience working with these platforms and can easily add plug-ins and integrate payment processing. Another advantage of choosing one of these bigger platforms is that they offer numerous integrations with other marketplaces.
If you decided not to enlist the services of a web developer, many of these platforms are aimed at beginners and use a drag-and-drop builder that makes it easy to create your own site. So, you don’t really need to have coding knowledge or technical skills with one of these platforms. Wix, for example, is a very user-friendly platform that is perfect for beginners, while an eCommerce platform like Magento is better suited for someone with coding experience.
5. Select a theme (optional)
While you can create your eCommerce site from scratch, there are thousands of top themes and templates available. So, you are bound to find something that matches the mental image you have of your store and create the effect you have in mind. Working with a theme or template can really save you loads of time and frustration. It will help you to put together an intuitive layout that will boost your sales and traffic.
6. Make your site live
It can be a good idea to let your website go live even before you have listed your products. For now, you actually need only three pages: home page, about, and contact details. While you want to include something about the products that you are selling on your “About Us” page, it is also important to include powerful reasons why they should support your business. In short, what sets you apart?
The reason for suggesting that you can make your site live before you have added your products is that by having this part of your website up and running, you can start to build your brand in the meantime. It can, for example, help you to work out deals with vendors as your website (even without its product pages) will help to show that you are in fact legitimate. Also, if you want to start marketing your site, you will have a place for blog posts and other mentions to link back to (backlinks are crucial for search engine optimization).
7. Choose a payment gateway
With the help of a payment gateway and credit card processor, you will be able to accept credit card payments via your eCommerce site. Though, a word of warning is that credit card processors are reluctant to work with businesses that are inexperienced as they come with too much risk. So, be prepared to show to them why your business will be successful.
You will first need to create a secure checkout process on your site prior to applying for a payment gateway and credit card processor. You will also need to write a Return and Privacy Policy and work out your delivery options (these details together with your email address and phone number should be included on your site for visitors to see). As this application process can be quite hard and can take some time, start with it well in advance and ensure that you are prepared (and patient).
On the other hand, if you opted to work with an eCommerce platform, this step becomes much easier. Shopify, for example, integrates with more than 100 payment gateways. They will equip your eCommerce business with an SSL certificate and PCI compliancy.
8. Start pitching your site to others
Even though your eCommerce site might not have a physical location, personal relationships still matter a lot. If you are selling different products and brands you will want to reach out to vendors. They are the best informed about the products that you’re selling and can inform you about trends which will help you to boost your sales. Also, by building a relationship with them, they will be more inclined to share special deals or ideas for marketing campaigns with you.
If you are only selling your own homemade products, personal relationships with editors and bloggers will be your focus. You can, for instance, contact a blogger or influencer with a good story that will showcase your expertise and how your products are different from others on the market. Not only will this help with exposure, but also SEO.
To help you with this process, you can, for example, use PitchBox or HARO. Pitchbox automates much of this process by sending an initial pitch to a media contact or vendor and follow-up emails if the contact has not responded yet. As you can write the copy that you want to be used for the initial pitch and follow-up email, you do not run the risk of the messages sounding too impersonal and generic.
HARO (Help A Reporter Out) is a free tool that you can use for SEO and PR. It offers writers a database of sources that they can use for new stories. For example, a writer can send a query to which he/she will then receive pitches. The advantage of using such a tool is that it can help you boost the exposure of your brand and assist with your SEO efforts as you will be able to get some valuable exposure on popular websites.
9. Design your packaging and finalize storage and shipping

Before you are ready to start taking orders, you will need to know how you will store your products and deliver them. With regards to storing your inventory, you can either store all your inventory in a warehouse or make use of drop-shipping. In short, drop-shipping allows you to sell your products directly to your customers without buying or keeping products. It might sound like a strange concept to you, but the only thing that your customers are concerned about is getting the product in working condition on time. So, they are not interested in where the product actually is when they buy it.
Though, bear in mind that while drop-shipping might be the answer to your storage problem, it can complicate your shipping. Your distributor might have various warehouses which could cause some errors.
With regards to shipping, you will need to decide if you will use the postal service or a delivery service company. Perhaps you want to use both to track and deliver your orders? Then, you will also have to find out if the types of products that you are selling have any shipping restrictions.
Once you have the process sorted out, you can give thought to your actual packaging. You will need to think about what you will ship it in and the size of this packaging. Designing your packaging is also an opportunity to create your brand identity. As part of their digital marketing strategies, increasingly more brands are turning to eco-friendly packaging to show that their brand takes sustainability seriously.
Wrapping Things Up
Creating an eCommerce website might be an elaborate process, but it can be a lot more straightforward for the average person to begin an eCommerce business than a traditional store with physical locations. With an eCommerce website, you can always start small and scale as your knowledge increases.
To ensure that you are ready to ship your products, it is key that you follow these steps. Not only will this step-by-step approach ensure that your site is up and running promptly, but it will also ensure that you pay attention to SEO and marketing which will help you to ensure that you already have customers when you launch.